Pages

Tuesday, 17 June 2014

Toy Tower Labelling

My daughters toy tower sits nicely right at the end of the bed in her room and mainly held a jumble of different toys. There was jigsaws, stuffed toys, and generally things that my daughter never thought about on a day to day basis.


I decided that it should be sectioned and labelled so it also made things easier for her to put things away and also to find what she wanted. After deciding what to put in each drawer (together and after a few disagreements with a 5 year old) we sorted what we wanted to put in each drawer. We decided on these categories
  • DVD's And Remotes
  • Beauty
  • Baby Doll Items
  • Dress Up

I got some PINK labels made up with pictures and words. She is starting Primary 1 in August so I want to teach her to coordinate these words with the items I suppose. I printed them out on glossy photo paper and stuck them on with ordinary Pritt Stick so if we need to change them around with other toys it is easily removed and is easy to clean off if labels aren’t required anymore.


We then popped everything inside the drawers.

Her DVD’s were sorted out and remotes were put in here with her notebook…. She’s a budding list maker like her mummy.


She really enjoyed helping me out organise her toys and went on a hunt to find other items that she had lying around in her handbags for her beauty drawer


And got all her baby dolls (named Janessa. Origin=unknown) things and put them in the baby dolls drawer.


And we put her dressing up clothes, shoes and handbags in the bottom drawer. 


I definitely have a budding organiser here and future heiress to the blog.


Getting her involved helped her to feel part of what went on in her room and since she is Miss Independent, and her mothers’ daughter, she didn't feel shocked as when I un-expectantly change something when she is at nursery.

What ways do you involve your children to feel involved and teach them to organise?

Friday, 13 June 2014

Absent Without Leave

So yes it appears I have been neglecting my blog for the last few weeks. I first of all apologise for that.

Lots have been going on but i'm raring to get back on track and deliver exciting posts again,

I have had a wedding, birthday, guests staying, chaos in the house ( its hard to organise around 3 other bodies staying for 4 weeks with a baby too)!

But I'm back! And have some posts lined up to make up for my absence


Tuesday, 13 May 2014

Garden Shed Challenge

This post today is about a challenge I took from my other half to sort out his shed. Usually the shed is left to him and I stay well clear. Its also usually a dumping ground for stuff I really don't want in the house. I said to him before to let me organise it and yesterday he asked when I was going to do it, also adding “I don't think there is much you can do though” and I swiftly responded with a loud “HA” and “I'll show you”  (does he really not know me?).

I lifted from my seat, headed to the shed and opened the door to this....


[Insert Scream here]

OK so I know it is a shed after all but it is a nightmare for an organising queen fanatic to look at. You can see there is left over blocks from the path he just paved, tools and paint on shelves and everything else just thrown/tossed/chucked inside. I of course had to take into consideration that this is a “man” space and that my normal array of baskets and cute displays would not cut it in here.

He already had sufficient shelving so I didn't have to worry about that. I started by completely emptying the whole lot out, to start with a blank space and think about what I needed to do. I still cannot believe the amount of stuff this small space was actually holding - A major fail on my part for not taking a photo of everything outside the shed.


I had already given him some jars to keep the nails and screws he had, but was not being used and he had some things in butter tubs but I don’t think these are the greatest of storage solutions as they just look untidy. I used jars instead and now must remember to keep more in future for him.

So now things had to go back in the shed I started by sorting through all of the screws and nails and labelled the jars the best I could with my label printer. I used old Oxi clean tubs for the odd ones. I put these on the top of the shelves he had already put up. I also put 3 little tin buckets on the bottom shelf for other bits and bobs he may be using and I think they look lovely.


For his power tools I thought about just placing on the shelves and leaving it but that would not be in my nature just to leave it just like that. Grabbing the label printer again I got to work creating little homes for each tool by labelling the shelves to where they should live. An old basin held his sanding sheets nicely.


For his fishing hooks, reels etc I put it in the big wooded box (that he made himself) which is under the pink box which I put his spare hand tools inside. 


On the top shelf to the left of the picture above, I put his drill which he uses a lot with his box of assorted screws. Beside that is car fluids, fence paint and the lawn feed is in the black container which used to be protein shake in there. Another basin on the shelf above the ladders has gardening tools like the trowel, fork and gloves.

I placed all the other equipment like his workbench, hose reel, spades and power washer he has around the shed.


Coming home from the park with our daughter he looked in the shelf and smiled. Asking him what he thought he asked “what's missing?”. He's pleased with the space he now has and the test is to now see how long it will stay this way.

What do you do to keep your shed tidy and organised? 

Perfect Happy Home


Linking to: 
A Bowl Full Of LemonsSay Not Sweet Anne and Family, Home and Life

Mother.Wife.Me  

Sunday, 11 May 2014

Happy One-Month Birthday Blog!


Yes I know its a bit sad doing a post just a month after its been launched but I've had this blog for a month today and wanted to post to say that this month I've had a blast!

I always thought I would love blogging and I was right, I've actually fell in love with this tiny world which is my blog. Writing about the stuff that I love to do has been fantastic and knowing some people are reading my posts has been a great confidence boost.

I've learned a lot this month and hope that you will again bare with me as I continue to make mistakes and fix them (again baby steps). I do look for feedback and hope that I will continue to get more comments as the months progress. I love reading them.

I've seen some great inspiration and linked up to some fantastic blogs that has given my stats a massive boost that I never dreamed of in a month. I cant believe I reached over the 1200 mark in a month and most of that has been with my fantastic High-Bed Shelf Ikea Hack that I linked up with I Heart Organizing, A Bowl Full Of Lemons and City Of Creative Dreams. I also loved the response I got from My Second Drawer post as well and repurposing in my Surprise Wardrobe Sort and Furniture Move in The Bedroom was a great achievement also this month.

I still have lots to do and have created a HUGE list of projects that need done, and some great tips and improvements I will be doing in the future that will all be shared with you all. So keep coming back and checking them out. I am going to continue to make changes to be happy with what I've done. I may even do a name change once I've decided on one I'm completely happy with.

I cant wait to see what lies ahead and maybe on my 1 year birthday we can again look back again on how we've grown.

Perfect Happy Home

Tuesday, 6 May 2014

Furniture Move In the Bedroom

As I mentioned before, I bought some new living room furniture and gave some of the old furniture for my son’s room. I really, really didn't want to get rid of any of my furniture I had before. My coffee table was ruined so that went to the recycling centre. The Desk we had but never used as a desk was a piece I have had for 13 years that I got as a present for my Christmas when I was around when I was 14 years old.

When the new furniture arrived I put the desk in the cupboard that goes under the stairs which is filled with my daughter’s toys (my sons has petered off now that he’s gotten older). It’s funny but the toys she never played with often and the ones I put at the back and was stuck, was the ones she always wanted for the week I had the cupboard. Extremely annoying having pull the whole lot out including her Step2 kitchen and desk.

I decided that the desk was to valuable a piece to just have in a cupboard so I made a decision to put it in our bedroom instead. There was a TV unit in it at the time which iv never been truly happy with and my OH kept some of his weight equipment behind it.

This is the before photo.


(Excuse my OH trainers, he was out cutting the grass at the time.)

 I measured it out and I started clearing out the bedroom. I got the desk from the cupboard and then got it upstairs. Placing it in the corner I arranged the TV and my new printer on the desk and a basket under for my partner’s weights in. I also labeled the plugs under it for the printer, television and extension with my label maker.


I'm so delighted with this idea I have decided to do this all over the house.

And here is the set up now. 


 I'm so delighted that I never had to get rid of a piece of furniture and it looks so much better now as well.

Just incase anyone is wondering what happened to the TV unit that was in the bedroom before. As it was narrower than the desk ( by about a foot ) I put it under the stairs in its place and put some of the storage tubs on top and inside. I actually prefer it and the toys at the back can actually come out without pulling the whole lot out! YAY! I may show in a future post once I get the cupboard painted

Did you ever find a piece of furniture fitted better somewhere else?
City Of Creative Dreams

creatingreallyawesomefreethings.com/
Perfect Happy Home

Tuesday, 29 April 2014

High-Bed Shelf Ikea Hack!

It’s been 2 years ago now, since I bought Michael his high-rise bed. It was a great purchase well worth the money. The first thing I though was he would be swinging and jumping off it onto the ceiling light but he has been very good on it actually and no accidents (so far). I'm still expecting to get a few more years from it too. When I decided I was going to buy the bed I knew I wanted to get him something to set his drink and remote control on and I seen one for £20 that would be perfect, but never got round to buying it. By the time I decided I was going to buy it, it had been removed from sale.

After getting new furniture in our living room and moving around Michael’s room he actually had the sad eyes and said “Mum when are you getting me my shelf”. Action had to be taken! After searching for a while there was so many like this one for over £50 but that was too much for me to spend on a shelf at the moment.

I looked online and came across the Ikea Spice Rack and measured it against our cups that he uses for juice and the length was perfect. So ordered one from EBay for £6.90 including postage. I also got some Rustoleum spray paint in Spa Blue for £5.60 from Amazon.

Once it arrived and got it together it looked like this:


 Then after a few coats of primer and a couple of coats of Rustoleum Spa Blue it looked like this:


It didn't come with fittings so we my partner got some and fixed it to the wall. I made sure that it was high enough that he won’t hit or kick it when he’s sleeping (he’s a wriggler). It’s the perfect depth that it doesn't stick out to much and can hold his book, cup and torch.

Even better than I expected!


The next morning I gave him breakfast in bed and he didn't have to get down to fetch his drink anymore. Always a success to make my boy happy!

Morning Sunshine!

Of course I can’t get one without the other so ordered one for my daughter as well for her mid-riser bed. It’s already primed and will be spray painted Pink, our favourite colour. I will update with a photo when it’s done.

High price - £51.99           

My price – £13.50 ( with paint left over as well)


Let me know what you think!

Linked to IHeart OrganizingA Bowl Full Of Lemons ,City Of Creative DreamsFamily, Home and Lifeand Say Not Sweet Anne

creatingreallyawesomefreethings.com/
Perfect Happy Home

Tuesday, 22 April 2014

Surprise Wardrobe Sort!

I'm really proud of myself for this cupboard organisation! It was a complete accident.

 I was actually looking for a black vest top that I wear under my work shirt that I thought might have fallen into the pile of shoes I have here. I was in shock at the state the cupboard was in....again. I've tried multiple attempts to organise this space and I’m failing miserably. So I pulled the whole lot out.


Here is the before photo


The crate on the left held my shoes and the crate on the right was boots. The pile at the end was my handbags and the shopper bag on top has Christmas presents I bought early for this coming year (organised!)

I started by donating/binning the boots, shoes and handbags which were not used in years or I didn't want anymore. I recently bought some new living room furniture and put our old furniture into my sons’ room to create an entertainment centre so he no longer had any use for an old bedside cabinet that held his controllers and headsets. I put this up to my mums’ garage a few days before and thought this might fit in the cupboard. 

I popped up and got it and with a little bit of wood underneath the feet it fitted perfectly! I have now put my under garments in the top drawer, vest tops in the second and my Christmas jumper in the bottom at the moment.

I think it looks perfect! 


The bottom crate now holds my handbags and the top one now holds ALL my footwear (yes I got rid of quite a bit). The OCD in me also cannot resist keeping my clothes in order of colour so that is how it will stay but I did also sort through it and put them to the clothing bank. I always used to chuck my work clothes over a chair or on top of the crate of shoes so I can now fold it neatly on the cabinet. I think this looks fantastic and is working well so far. Not bad organising by an accident and cost £0.


Perfect Happy Home

Linked to A Bowl Full of Lemons Link Party and City of Creative Dreams

Sunday, 20 April 2014

Happy Easter Everyone


We have a great day planned for Easter here in sunny Scotland! Our Easter egg hunt starts first with the kids searching in garden, then we will go a drive to find the biggest hill to roll our painted eggs down it. Finishing off with a lovely Chicken Roast Dinner!

I hope everyone has a great day too!


Happy Easter!

Friday, 18 April 2014

Easter decoration

With Easter coming up this week I decided to step it up a level this year. We do the special Easter hunt for the kids in the garden and give out chocolate eggs but thought we should celebrate with an egg-cellent display.


I started by finding a spare basket I got with a Christmas gift and I first of all looked online for shredded tissue paper but a light bulb went off in my head as I thought I could just shred my own from my stock of paper.

Deciding on the colours pink, green, yellow and blue I took the paper to my work and used the shredder there.


I filled the basket with the paper to make it look like a nest


To fill my nest I got a pack of dyes from Lidl and only picked 3 of the colours because they can’t be sealed once opened. I will save the rest for next year. My daughter at the same time painted some with her paints and added some glitter to them (and my floor). I've had the knitted chickens since last year and I filled them again with Cadbury Crème Eggs (yum) and placed them on my sideboard.


I put some yellow tissue paper under the nest. Excuse the rubber ducky to the left.


Completed with a bunny banner. Come Sunday and when the kids start their Easter hunt outside - weather permitting - I can have the rest of their chocolate eggs ready for them when they come inside. Then a trip to the biggest hill we can find for rolling our painted/dyed eggs down them.

Perfect Happy Home

Friday, 11 April 2014

My Second Drawer

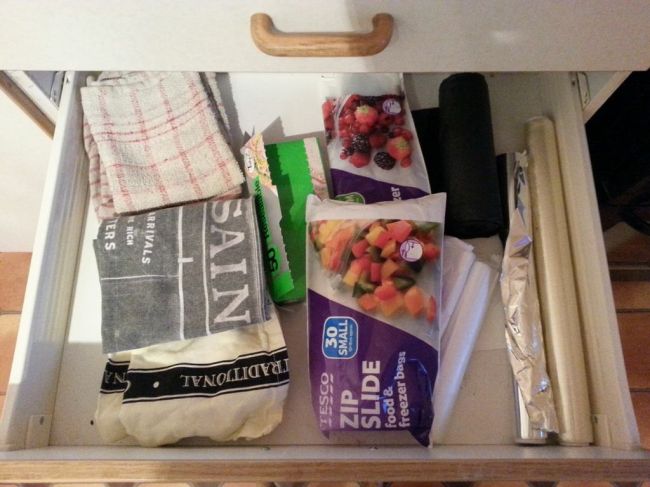
In my kitchen, my second drawer down in my kitchen housed my dish towels and things like tinfoil, sandwich bags and black bin bags. 


Unfortunately it looked like this


Image

Grrrrr....I hated how everything moved around. I also apologise for the lighting in my photos. I'm learning, but unfortunately my kitchen has not got the greatest light in this area.


So I was trying to come up with a solution that rolled around my head for many months before eventually finding the perfect thing! I considered tension rods which came in at around £3.99 each. I also thought of dividers that might keep the towels etc separate. None on them seemed like an easy solution to maintain in the long runs. 


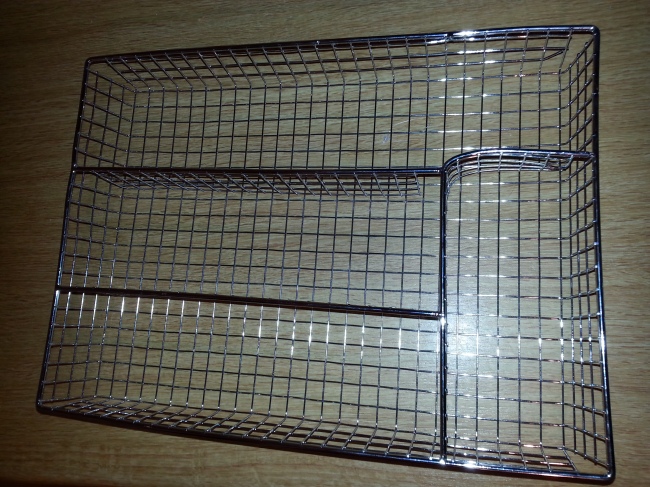
So instead I got one of these!


Image

Yes! A cutlery divider! I got my partner to bend one of the sections round so to create a longer section as the tinfoil didn't fit in it so a little snip, a bend and a knock with the hammer and 


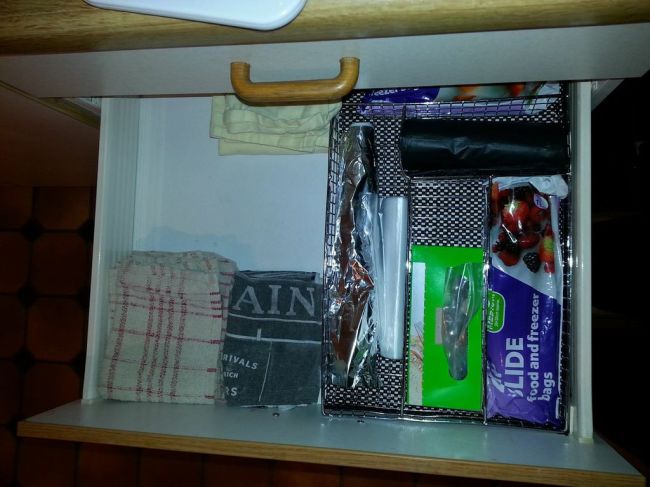
TADA!


Image

I'm so happy with the end result! I placed a piece of gripper mat underneath so it wouldn't shoot back and forth when opening the drawer. I now have a section for each thing! I have my clingfilm in another drawer with my grease proof paper as I don't use it as often. Its been a few days now and it appears to be working and is still staying neat and tidy.


Does anyone else have another solution to this problem they can share or perhaps I'm not the first to do this solution. 
Leave a comment of what you think.

Linked to I Heart Organising

Earphone Storage Idea

So while I'm fixing up some of my posts , I'm itching to post something that will get the ball going.  So I thought I would show you my neat and tidy way of storing earphones

I'm sure everyone can agree that tangled, messy earphones are a common find in our drawers in most homes. I got fed up of finding them all over the house as well.

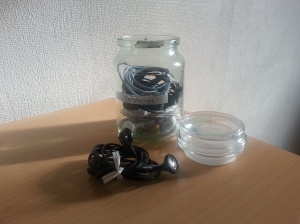
After sorting through the damaged ones and also the ones for phones that we don't own any more I used sandwich bag ties to twist them round together which I have loads of as I don't use them for the sandwich bags.

.20140318_142121

I love reusing coffee jars like these with the sealed lid.
I popped all the tied earphones in the jar, printed a label for it with my wonderful label maker and placed it in my bookcase. Now everyone knows where to go and won't have to spend extra time untangling them.
More posts like this to come! I would love your feedback and suggestions.

See you soon!

My First Post

Hi Everyone!


My first post YAY! I honestly thought this would be easier Let me introduce myself;
My names Alana! I live in Scotland with my partner and two children. I decided to do this after reading lots of amazing blogs from people in America and realised that the UK lacks this great source of information. What better a source than people themselves sharing tips and ideas. I have found loads of inspiration and want to share it all with the world.

My blog is mainly going to be about what I love to do the most - organise and create great spaces in my home! I get excited about baskets, tubs and anything that I can use to contain something. I will soon post up some of the organising that I have finished, I have some great ideas to share and can't wait to hear feedback.

See you soon!